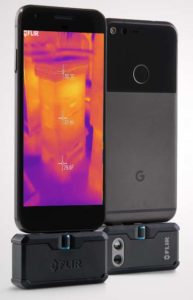
MCBA is very proud to own two FLIR infrared cameras which members can BORROW FOR FREE. Very few clubs in the country offer this.
 Our cameras only work when they are attached to your phone. One camera only attaches to Android phones (Samsung, Pixel, Moto) and the other only attaches to Apple phones. Be sure to request the camera that matches your phone's operating system: Apple or Android. If you borrow the wrong FLIR camera, it will not work and you may damage it.
To use the camera, you'll also need to download the free FLIR ONE app to your tablet/smartphone from the app store. Android / Apple
The FLIR ONE is cool because it is actually two cameras in one. It simultaneously takes a visual light (normal) picture and a high resolution thermal picture. It uses the visual light picture to create outlines of objects, then superimposes the outlines over the thermal images to make them easier to interpret. In the app, you can also slide back and forth between the normal picture and the thermal image to further understand what is hot, and what is not.
TIP: The more you know about infrared photography, the more informative your images will be and the more you will learn about your bees when using this camera. Some terms to search on are “infrared camera”, ”emissivity”, and “thermography”. Misperceptions are common. IR images do not show the temperature inside the hive, but at the exterior surface. In different images, the same color can mean different temperatures. External heat sources and sinks, such as sunlight, wind, and air temperature all affect the surface temperature of the hive, so to be informative, images should be taken in calm air in early morning darkness.
1. You must be a current MCBA member.
2. You must sign the Conditions for Borrowing the FLIR Camera, indicating that you agree to:
- Return the camera in one week or sooner.
- Reimburse MCBA ($400) if the camera is lost, stolen, damaged, etc.
- Take the Precautions listed below.
- Study the FLIR Quick Start Guide and the FLIR User Guide below (or as PDF Quick Start Guide : Users Guide )
- Make your FLIR images available to MCBA to further beekeeper education.
FYI, you are NOT LOGGED IN. When MCBA members are logged in, they'll see a FORM to REQUEST the FLIR at the very bottom of this page.
PRECAUTIONS:
Handle the FLIR like a prized Queen. But remember, that if you drop a queen, she doesn't break.
- The FLIR ONE Pro is a delicate scientific instrument. Damage/Loss/Replacement cost to you is $400.
- The FLIR ONE Pro is not waterproof. Do not use in rain snow, or mist. Keep it away from all liquids.
- Do not place in a location where it could fall.
- Protect the lenses from fingerprints and other objects.
- The FLIR ONE’s USB connection is vulnerable to damage from bending and twisting. Use care when connecting/disconnecting from your phone, and operating.
- Never slip your phone into your pocket with the FLIR attached, even for a moment between taking pictures. The USB connection will bend and break.
- When it is detached, never put the FLIR in your pocket, purse, backpack unless it is in its protective case. Lint will dirty the lens, and other objects could scratch the lenses.
- Between uses, and when transporting the FLIR, please, always store the FLIR in its protective case, with its wires and usb adapter in the case pocket - not attached.
FLIR ONE PRO QUICK START GUIDE
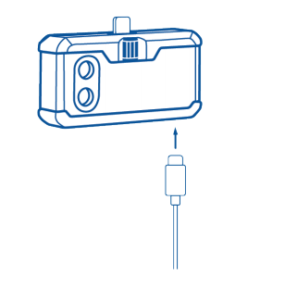
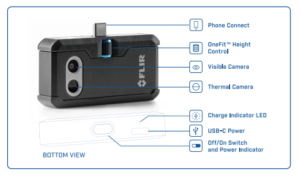
 STEP 1: Charge the FLIR ONE Pro with the included USB-C power cable connected to a power source. The Charge Indicator light next to the USB-C connection blinks on and off while the FLIR ONE Pro is charging and stays on continuously when it is fully charged. It will take about one hour to completely charge the FLIR ONE Pro. Ensure that the FLIR ONE Pro is fully charged before using it.
STEP 2: Download and install the FLIR ONE app, which is available from the Google Play Store. When you start the FLIR ONE app, the first-time User Guide will help you to get started.
STEP 3: Press the power button on the bottom of the FLIR ONE to turn it on. The indicator light will turn orange. It will flash green when the device is ready. If needed, adjust the blue dial of the OneFit™ and extend the connector to the appropriate length to fit through your smartphone’s protective case. Connect the FLIR ONE to your smart phone and start the FLIR ONE app.
STEP 4: Check out the app’s Home screen to access your gallery, get the latest Tips & Tricks for using your FLIR ONE, share your photos and videos with the FLIR ONE community, and stay up to date with all the latest news and promotions from FLIR.
STEP 5: Explore all the Camera features on the FLIR ONE Pro.
COLOR PALETTES
• Tap on the Features icon in the bottom right of the screen
• Choose between 9 different color palettes
SPOT METERS AND REGIONS OF INTEREST (ROI)
• Tap on the Spot Meter icon in the top left corner to get a list of spot meters and ROIs. Add the number you want and click the icon again. Up to three spot meters, three square ROIs, and three circular ROIs can be displayed at one time.
• Tap and hold the Spot Meter to move it around the screen. Pinch to adjust the size of the ROIs, or tap and hold them to move them around the screen.
TIMER
• Set a timer for 3 or 5 seconds
CHANGE CAMERA MODES
• Select Video, Photo or Time Lapse
MSX® PARALLAX
• The image that displays in the app is a combination of a thermal image and a visible-light image through a unique process called FLIR MSX. The FLIR ONE Pro thermal camera can produce an image even in total darkness. When visible light is available, the FLIR ONE Pro visible-light camera is used to enhance the detail of the FLIR ONE Pro thermal camera.
• When looking at an image up close, or far away, you can adjust the MSX alignment for the object to align the thermal and visible-light images. Tap on the features button on the bottom right corner, tap MSX Distance, and adjust as needed.
USER GUIDE
The FLIR ONE Pro allows you to see the world in a whole new way, with a unique blend of thermal and visible imaging. This User Guide provides the information you will need to use the FLIR ONE Pro.
CHARGING THE FLIR ONE PRO: Plug the USB-C end of the power cable into the FLIR ONE Pro and plug the other end into a USB-A port of a power source. The Charge Indicator LED will blink while the device is charging. The FLIR ONE Pro will charge to full capacity in about 1 hour. When the device is fully charged, the Charge Indicator LED will be on continuously. The FLIR ONE Pro is not intended to be charged while in use.
FLIR ONE APP: The latest version of the FLIR ONE app is available on the Google Play Store for Android. Download and install the app, then start it. Turn on the FLIR ONE Pro and connect it to your phone. If the FLIR ONE Pro is turned off, the app will prompt you to attach your FLIR ONE Pro camera before you can view the camera feature.
APP OVERVIEW: At the top of the screen there is a black bar with icons for the slide-out menu, Spot Meter, Torch, Timer, and Calibration. Below that is the live image, and at the bottom of the screen is another black bar with icons for the Gallery, Camera, Image Controls, and Mode (Photo, Video, or Time Lapse).
TAKING PICTURES: At the top of the bottom bar, swipe right or left to select Photo mode. Tap the round white button at the bottom of the screen to save a snapshot. The images are saved to the Gallery. In the App Settings, it is also possible to have the images saved to the phone’s image library. To view the most recent saved image, tap on the thumbnail in the lower left. When viewing an image, swipe up or down on the image to reveal the underlying image from the visible camera. It is not necessary to have the FLIR ONE Pro camera attached to the phone to view saved images.
TAKING VIDEO: At the top of the bottom bar, swipe right or left to select Video mode. Then tap on the red button to begin video capture. Tap on the red button again to stop the video capture and save the video in the FLIR Library. To view the captured video, tap the thumbnail image in the lower left of the screen to access the Gallery.
TIME-LAPSE VIDEO: At the top of the bottom bar, swipe right to select Time-Lapse mode. Then tap on the red button to display the Time-Lapse options. Adjust the options as needed, and then tap the red button to begin video capture. Tap on the red button again to stop the video capture.
GALLERY: Captured images and video may be viewed and edited by selecting the thumbnail image in the lower left corner of the screen. Images and videos may be shared through text messaging or email and may be edited by changing the color palette or the temperature scale. While an image is being viewed, it is possible to swipe up or down to reveal the visible image that is used for MSX® blending.
CHANGING COLOR PALETTES: On the display (the live image), tap the Imaging Options menu in the bottom right corner of the screen. Tap the Color Palette icon to change how the image is displayed. Select one of the displayed color palettes. The app allows a choice from nine different palettes that include color, grayscale, or a combination of both.
IR SCALE: The FLIR ONE Pro will show you the temperature range of the scene, and allow you to adjust the temperature mapping, using a feature called IR Scale. To use, tap on the IR Scale icon in the Imaging Options menu. The scale will appear on the left side of the screen, with the high and low temperatures labeled. You can adjust the color mapping by pressing and holding the bar and sliding it up or down. You can also manually tap the measurements and type in your selected limits.
GAIN MODE: The FLIR ONE Pro has an extended range for the temperatures. It can measure, up to 400 degrees Celsius (752 degrees Fahrenheit). High gain is the standard mode. To use, tap the Gain mode icon within the Imaging Options menu. Select the Low option and use the spot meters or regions of interest as you would in the standard mode.
SPOT METERS AND REGIONS OF INTEREST (ROI): When using spot meters and regions of interest, the FLIR ONE Pro will display a temperature average (in degrees C or F) on the image. The accuracy of the Spot Meter(s) depends on many factors, including the distance from the object, the ambient temperature, and the emissivity of the material being observed. Users are encouraged to learn more about the science of Thermography. To switch between Fahrenheit to Celsius, use the Settings option in the Control Panel. Note: To add spot meters and/or ROIs, tap on the Spot Meter icon in the top left corner to get a list of spot meters and ROIs. Up to three spot meters, three square ROIs, and three circular ROIs can be displayed at one time. Tap and hold the Spot Meter to move it around the screen. Pinch to adjust the size of the ROI.
FLASHLIGHT (TORCH) FLIR MSX: is a patented technology which makes use of the visible camera in the FLIR ONE Pro to maximize detail and image sharpness. This feature requires some amount of visible light, so in dark environments turn on the smartphone’s flashlight to enhance the image detail. This feature makes use of the light that is built into the phone.
TIMER: The Timer option allows the user to set a time delay before an image is saved. When the Timer icon is selected, the Timer control panel is displayed. The user can set a time delay of 3 seconds,10 seconds or turn off the time delay option. When the Timer delay is enabled, the user saves an image by tapping the round white button at the bottom of the screen, and then a timer displays the countdown.
AUTOMATIC CALIBRATION: The camera has a mechanical shutter inside that periodically activates and allows the thermal camera to do a calibration or image refresh. When the shutter activates, the image will freeze for a brief period. When the camera first turns on, and periodically thereafter, the app will perform an automatic calibration to provide an optimal image. It is also possible to manually activate the shutter by tapping the Calibration icon in the upper right on the main screen. Calibration can be switched to manual by turning off Automatic Calibration in the Settings Menu.
MSX ALIGNMENT CONTROL: The FLIR ONE Pro is tuned to align thermal and visual images at a distance of 3 meters. To view scenes close-up, use the MSX Distance slider control. Tap MSX Distance control to activate the slider control, then adjust the alignment by sliding the control. To exit the slider control, simply tap the icon again.
LOCK SPAN: The Lock Span function locks the temperature range of colors in the display to the scene you are looking at. Simply tap the Lock Span icon to hold the range, and tap it again to return to auto-scaling of the scene.
SETTINGS MENU: The Settings Menu allows the user to configure additional features on the FLIR ONE Pro, as described below.
HELP More information about the FLIR ONE Pro is available through the Help section and the Tips and Tricks content in the app.
PDF versions of the above info: Quick Start Guide / Users Guide
TIPS AND TRICKS:
As we learn more from our research and using the FLIR ONE PRO, we will add tips to the list below so that everyone can get the most from the FLIR. If you have a tip about using the FLIR that will help other club members, please send it to the club webmaster to review. Thanks!
- For maximum accuracy, it is best to image hives from a distance of six feet (two meters) or less, looking straight on from the camera to the hive surface to minimize reflections of thermal signatures. Source: Bee Culture
- The manufacturer has some helpful information on their support pages: Click HERE
- Some of the FLIR documentation refers to IOS. The club camera only works with Android devices. Do not try to use the club FLIR Pro with an Apple device, even if the connectors are compatible.
FLIR AVAILABILITY:
Please check this calendar for FLIR availability before requesting to borrow it.
A red bar across a date means the FLIR is not available on that day.
REQUEST FORM
You are NOT LOGGED IN. When you have logged in, you will see a link to request the FLIR camera at the very bottom of this page. You can log in by clicking on Login on the menu at the top of this page.

